

Regular maintenance and parts

Submenu
Here you will find an overview of the most commonly used parts you need for regular maintenance of your Valkyrie, along with various tips and links to the respective tasks. Use the submenu as a shortcut, or simply scroll down on the page.
Before you begin, I recommend that you read the Valkyrie Maintenance guide.
You will also benefit from the complete Honda Valkyrie GL1500 Service Book. It has been scanned and made searchable. You can search it with the keys Ctrl + F (PC) or Command + F (Mac). Holld and sllide your finger on youur mobile device. Enter your search term in the field that appears, and press enter. This will take you to the first match. Press enter or F3 to get to the next match for the same search term.
Some original parts may be difficult to obtain, or youu'd llike an option. See the list of generic parts.
Also see: VRCC 1500 tech board and 1800 tech board
Exhaust
See section 2-12 of the service manual for how to replace exhaust gaskets.
NB! When replacing exhaust gaskets, make sure you get all the old gasket residue out. They can disintegrate and be difficult to see.
When installing new ones, be careful not to overtighten the nuts in the block. Max 10 Nm (1.0 kgf-m, 7 Ibf-ft). Run the engine so the exhaust system can warm up and cool down a few times, and retighten. If you don't have a torque wrench, tighten by hand, then max 1/2 turn.
Rear wheel


VRCC Norway/tech archive:
Rear wheel and final drive removal and maintenance part 1
Rear wheel and final drive maintenance part 2
Videos:
Front wheel

Final drive


VRCC Shoptalk: The elusive 3rd O-ring
VRCC Norway/tech archive:
Rear wheel and final drive removal and maintenance part 1
Rear wheel and final drive maintenance part 2
Final drive maintenance part 3 lube and install
Final drive maintenance part 4 and final
Also read this before you start! Final drive service update
Air filter

Oil filter


Engine oil
There are some very good motor oils that some people use in their motorcycles, while others wouldn't even THINK about putting anything in their engines that didn't clearly state on the label that it was made specifically for motorcycles. Some are absolutely convinced that synthetic motorcycle oil doesn't break down as quickly, and wouldn't use anything else in their motorcycles. Others choose to stick with dinosaur oil.
As long as you choose a state-of-the-art oil product that meets the specifications for your engine, the choice is yours.
VOLUME: 3.75 to 3.9 QTS / 3.6 to 3.7 LITERS
Light bulbs
See section 19-2 in the service manual for how to replace light bulbs.
Standard / Tourer
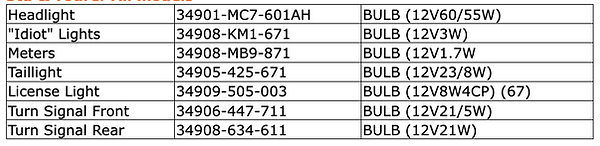
"Idiot lights" refers to the oil pressure/high temperature indicator light.
Interstate

Petcock


The petcock is vacuum-operated and contains rubber diaphragms. It receives its signal through a hose connected to the back of the intake manifold on cylinder number 6 (rear left side). In some cases, it may be located on another cylinder. This has no practical significance for the function. All of this is to ensure that the petcock closes and opens automatically if it is in the ON or RES position. The diaphragms wear out over time and can, in the worst case, disintegrate. Then you have a defective petcock. It is not certain that it will close in the OFF position. Claims that this is a bulletproof method to avoid problems are a myth!
Such a defect can have major consequences, such as Hydrolock. Early symptoms can include increased fuel consumption, uneven engine running, noticeable change in choke function, sooting of the spark plug on one cylinder and blacker smoke out of one exhaust pipe.
It is therefore recommended to overhaul the petcock, alternatively replace it with a new one as a precaution if you do not know if it has been done recently.
VRCC shoptalk: Servicing the petcock
Hydrolock is caused by fuel leaking through the petcock, past the diaphragm. It also requires a float to be stuck in a carburetor. If it hasn't been done, you should seriously consider to rebuild the carburetors.
Fuel goes through a faulty petcock and into a faulty carburetor, causing fuel to drip directly into a cylinder. When you press the starter button to start the engine, you are telling the piston to compress raw fuel in the cylinder that has the problem. If you suspect hydrolock, you can either remove the spark plugs before starting the engine, which will make room for the raw fuel, or just briefly press the starter button instead of pressing and holding it until it starts. Pressing the starter and listening carefully should let you feel the starter stop while it tries to compress the raw fuel. It will continue to turn if you have no problems. This can still be very risky!
VRCC Norway/tech archive:
Carburetor rebuild tear down part 1
Carburetor rebuild tear down part 2
If you have experienced hydrolock, you will also need to overhaul the carburetors to ensure proper function of the float bowls.
A hydrolock will most often result in a broken gear on the starter ring gear of the engine. Read more about how to repair this in hydrolock repair part 1 and hydrolock repair part 2. You will need these special tools to do the job.
Some people choose to retrofit an electrically controlled valve (shut off valve), the most popular one is called Dan Marc. It shuts off the fuel supply to the carburetors when the ignition is turned off. Read more about connecting this here! Read the article about installation and bracket here!
You can keep the original petcock, replace it with a manual one to eliminate the diaphragm issues, or replace it with a pingel. Read more about Dan Marc with pingel here!
Spark plugs

Brake pads

Intake runner o-rings
Gear shifter seal

Gear shifter seal
